Posted on 3 Comments

I’m new to bitcoin, what are the options for paying for my order using bitcoin?

I’m sure all of you have heard about bitcoin by now and have a general understanding of it. Bitcoin is here to stay, the adoption by major institutions and banks has made it much easier to use now. Over the next years we see the w2w, w/u, and mg payment options getting harder and harder to use (not to mention more expensive). I am writing this post to outline and explain some of the easiest ways to pay for your order using bitcoin. It’s not as hard as it used to be, and its actually much cheaper then w2w, w/u, and mg. 

Online wallet and smartphone apps.

You can go online to set up, and fund your new wallet using a debit or credit card. We recommend using either coinbase, or cash app (cash app iOS or cash app Android). They both provide iOS & Android apps on your smartphone along with websites that allow you to create an account. Depending on what wallet you prefer, the set up time for the wallet is minimal. The process involves creating an acct with basic personal information. You then complete a brief KYC questioner which stands for ‘Know Your Customer’. These online wallets are required to have an image of a valid state issued ID on file. You take a picture of your ID and upload it, thats it. The reason for the KYC requirement is because you’ll be linking your debit or credit card to the acct, this is how you will fund it. To create the acct and link the debit or credit card takes about 10-15 min. We recommend linking your debit card to the acct, as this is the fastest way to fund it. If you choose to fund with a credit card they put a 3 day approval hold on the acct, for fraud purposes. Using the debit card takes 1-2 days for the acct to be funded/approved & active to buy/sell and send/receive Bitcoin. The set up process for opening a cash app or coinbase acct takes 15 min to open up, and 1-2 days to get approved (if you link to a debit card), but once approved you can pay for orders literally in 20 seconds. It’s so much easier than having to go into a physical location to send a western union, money gram or Walmart to Walmart payment, not to mention your order ships out the same day the payment is received. 

Pro’s

  • You can pay for your order in 20 sec. online without leaving home
  • Faster shipping time as we receive the payment in seconds and prep shipment the same day. 
  • No risk of having payment flagged like w/u, MG, and w2w, and having to drive back to the store to refund and resend the payment.  
  • Low fee’s to send payments (much cheaper then w/u, mg, and w2w)

Cons

  • Approval can take 1-2 days
  • Must complete KYC

We feel these online wallets are the easiest way to use bitcoin on an ongoing basis to pay for your order. Once the wallet is set up your able to buy bitcoin using funds from your debit card, and then send the Bitcoin to pay for your order within 20 seconds. You must complete the KYC questioner and provide an image of your drivers license, but you give the same exact info to the clerk when you send payment using W/U, MG, and w2w. You still remain anonymous using bitcoin, no one can see who your sending payment to & no-one knows what its for. If you want to use this method I highly recommend setting up an acct before you are ready to order, that way you have a few days to let the approval process complete and you’re able to send payment immediately when you place order with GearDepot.

Bitcoin ATM

There are bitcoin ATM’s popping up all over the world now due to the popularity of bitcoin and other crypto currencies. We call these BTM’s (bitcoin ATM’s). The function BTM is to allow the customer to put cash into the machine, and convert it to bitcoin. Most people use these machines to fund their own wallets, but if you don’t have a wallet and are new to Bitcoin you will simply use the machine to fund our wallet. When you deposit the cash the machine will ask you if you’re finding your own wallet? Or sending to someone else. If you choose the option to end your own wallet, but give them our wallet address it will bypass your need to complete the KYC questioner. So basically if you don’t want to create a wallet and simply want to pay for your order using cash, you can go to one of these BTM’s and deposit cash that is converted to Bitcoin then send to us to complete payment o your order. The only drawback on these BTM’s is the high fee’s they charge, most of them range from 7% – 20% to use them. If you want to use this option we can do a search for BTM’s in your are and help you select one that has fee’s under 10%. Many times these BTM’s don’t list their fee’s online in an effort to dupe you into starting the process on the machine only to find out hey are going to charge you 17% for send $300 or something. If you can find one of these BTM’s that has appropriate fees in your area this can be a great option for using bitcoin, but not having to create an acct etc. 

Pro’s

  • No need to create online wallet
  • No KYC questioner
  • Payment funds fast, no waiting for receiver to collect funds

Con’s

  • High fee’s 6-20%
  • Limited number of BTM locations in most areas

The BTM is a good solution if you are opposed to opening up a crypto wallet/account. The main drawback are the high fee’s these guys charge too use their service. You can think of it like withdrawing cash from a ATM in Vegas or something, you can def get the job done but you’ll pay a higher fee to use it.

We are recommending our customers to try out bitcoin by opening a cash app wallet. We have put together a detailed step by step process that will walk you through the process start to finish. If you are interested in using this, we highly recommend starting the process before you place you next order so you can get the acct set up, verified and then funded before we send you the payment details for your order. If you do it in this order the process is silky smooth! If you have any questions on bitcoin and how to use it to pay for your order please let us know, we’re happy to help.
Posted on Leave a comment

Using “Cash App” to buy and send Bitcoin.

Cash App is a great method to buy and send Bitcoin to pay for your order. Here we guide you through the process of setting up the Cash App account, getting approved to buy and send Bitcoin, then buying and sending the Bitcoin to pay for your order. If you want to use Bitcoin to pay for your next order, I would highly recommend going through this process to open, verify, and fund your account. Then you can go onto the GearDepot website and place your order. Please note: when you place an order on the site and select ‘Cryptocurrency’ for payment, you will only have 15 min to make the payment. This process of setting up the Cash App account takes 1-2 days to get the verification process complete, hence the reason we suggest getting it out of the way before you place your next order.

You can think of Cash App as a bank account. When you’re setting it up, you will need to provide some basic info so you can be verified. The easiest way to do this is using the Cash App on iOS or Android. 

iOS App Store link

Android link

CREATING YOUR ACCOUNT

Install the app, then register an account by following these steps:

  1. Enter your mobile phone or email
  2. A confirmation code will be sent to you
  3. Enter the confirmation code on Cash App
  4. Link your bank by entering your debit card number.
  5. Enter first and last name
  6. Select a personal $Cashtag (this is a unique username for your account)
  7. At this point you can invite friends, or just skip and move forward.

FUNDING YOUR ACCOUNT

Next you will want to fund your Cash App account so you can purchase Bitcoin.

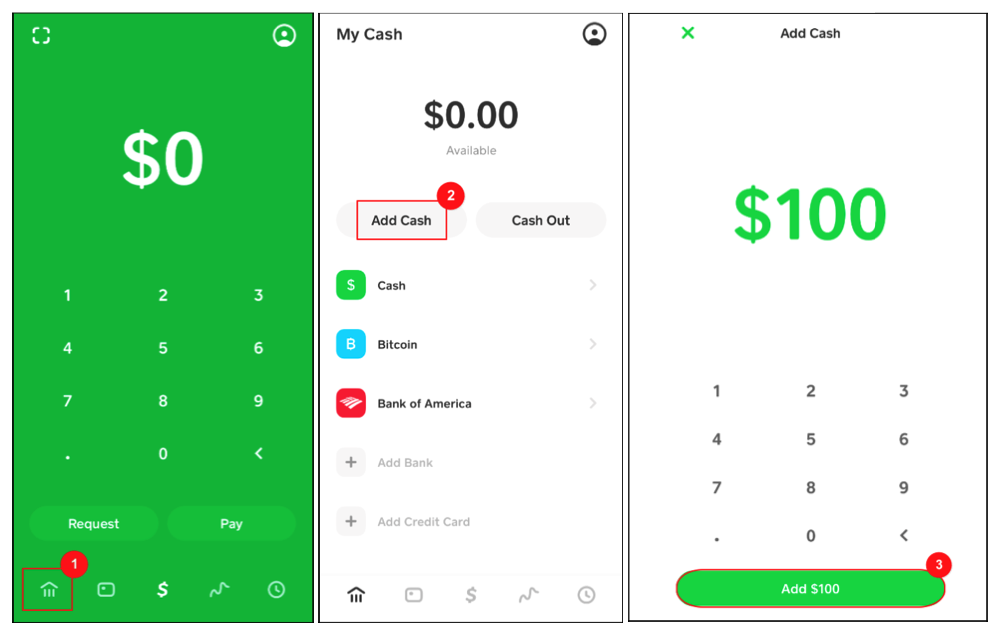
  1. Hit the Home icon at the bottom left of the screen.
  2. Tap “Add Cash”
  3. Enter the amount you want to fund the wallet with and tap “Add Cash”. (The funds are pulled from the debit card you used to set up your account with). If you want to only fund your account with what you anticipate your next order from us will be, then I would recommend funding the wallet with an extra 5% on top of the total order amount. If your order comes to $500, then it would be wise to fund the wallet with $525, to you make sure you have enough to cover any fee’s.

4. On the following screens it will ask you to confirm your name, date of birth, SS #, and home address.

Complete these details and the funds will be immediately added to your Cash App balance. Once you have completed this you will have your funds being held in the Cash App wallet. Similar to being held in a bank account, these funds are safe and can be used for buying items online or purchasing Bitcoin (which we will go over in the next steps).

VERIFYING YOUR ACCOUNT & BUYING BITCOIN

With your Cash App account funded, you’re now ready to buy some Bitcoin. If this is your first time purchasing Bitcoin on the app you will need to complete a verification process first. Cash App has to verify who you are with some extra information to ensure they are compliant with government regulations.

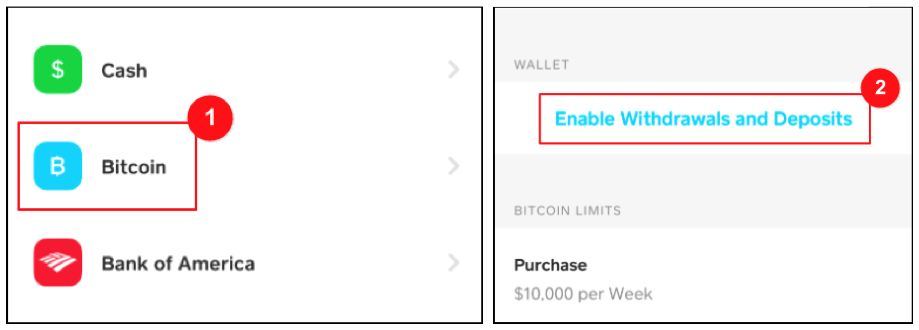
  1. From the app home screen, tap “Bitcoin”
  2. Hit “Enable Withdrawals and Deposits”

3. Cash App will request additional details such as email, reason you’re buying Bitcoin, and a question or two about your income and employment.

4. Next you’ll be asked to verify your identity with a license or state ID, by taking a photo of the front and back of your ID.

5. Take a clear lit photo of your face.

The app will now begin processing your ID for verification. This could take up to 48 hours, so sit tight. You will see the “Verification In Progress” message on your screen. As soon as the verification is complete, this message will be removed and you’ll get a text or email letting your know that you’re good to go.

ATTENTION: Once you have received the “APPROVAL” or “COMPLETED VERIFICATION” text or email from Cash App it is time to place your order on GearDepot. I recommend doing this at this point in the process so you know exactly how much Bitcoin you will need to buy in the Cash App to send for your order. If you already know how much your GearDepot order will cost, or you don’t mind buying a little extra Bitcoin, then you can go right to the next steps to buying the Bitcoin.

BUYING BITCOIN (ONCE YOUR ACCOUNT HAS BEEN VERIFIED)

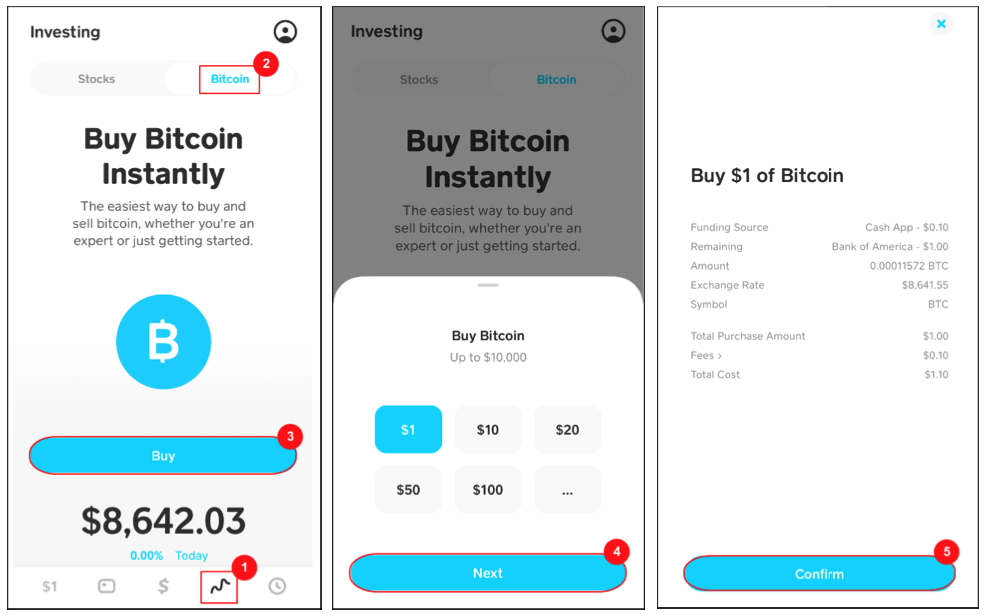
To Buy bitcoin, go to the “Investing” section of the app.

  1. The Investing section is the wavy line (ticker tape icon) at the bottom, second from the right of the screen
  2. Tap this, then on the next screen you’ll see “Stocks” and “Bitcoin” at the top. Select “Bitcoin”
  3. Hit the “Buy” button
  4. Select the amount and hit “Next”. (You should have received an email from us giving you the amount of your order in USD and in Bitcoin. I would select to buy $10 more than the amount total. For example, if the order is $400, buy $410 worth of Bitcoin to ensure you have enough after the small Bitcoin transaction fee is added in, this generally comes to less than 1% of the amount, depending on how busy the blockchain is)
  5. On the next screen hit “Confirm”

Note: if this is the first time you have purchased Bitcoin it will ask you to choose a 4-digit pin to use.

Please note, once you have gone through the 1-2 day verification process you do not have to do it again to buy Bitcoin. Anytime you want to go in and buy some bitcoin you can do it in a matter of seconds and be ready to fund your order immediately.

SENDING YOUR BITCOIN TO PAY FOR YOUR ORDER

Now that you have the appropriate amount of Bitcoin in your Cash App account, it is time to pay for your order.

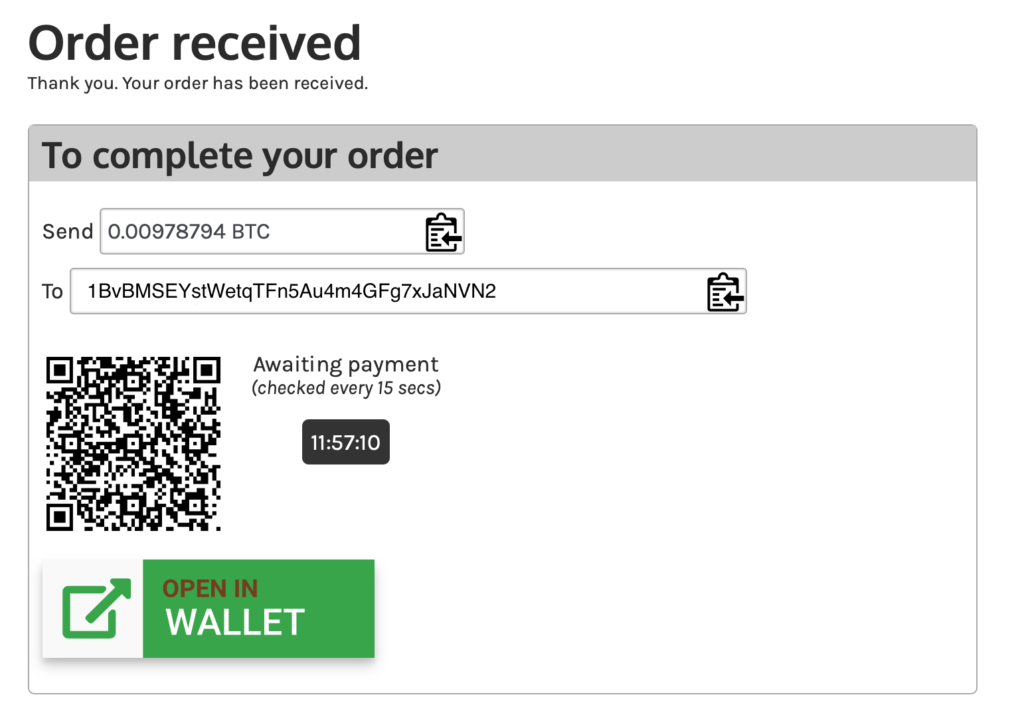
First, you will want to open up your GearDepot account and go to the payment page. If you selected cryptocurrency to pay for your order, there should be a page that looks like this, listing the price in Bitcoin for your order.

You can do this 1 of 2 ways.

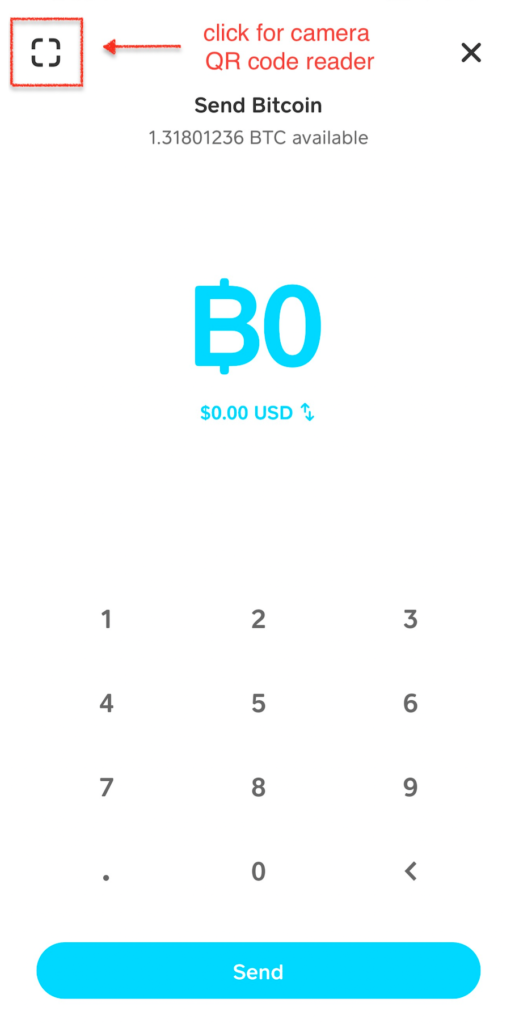
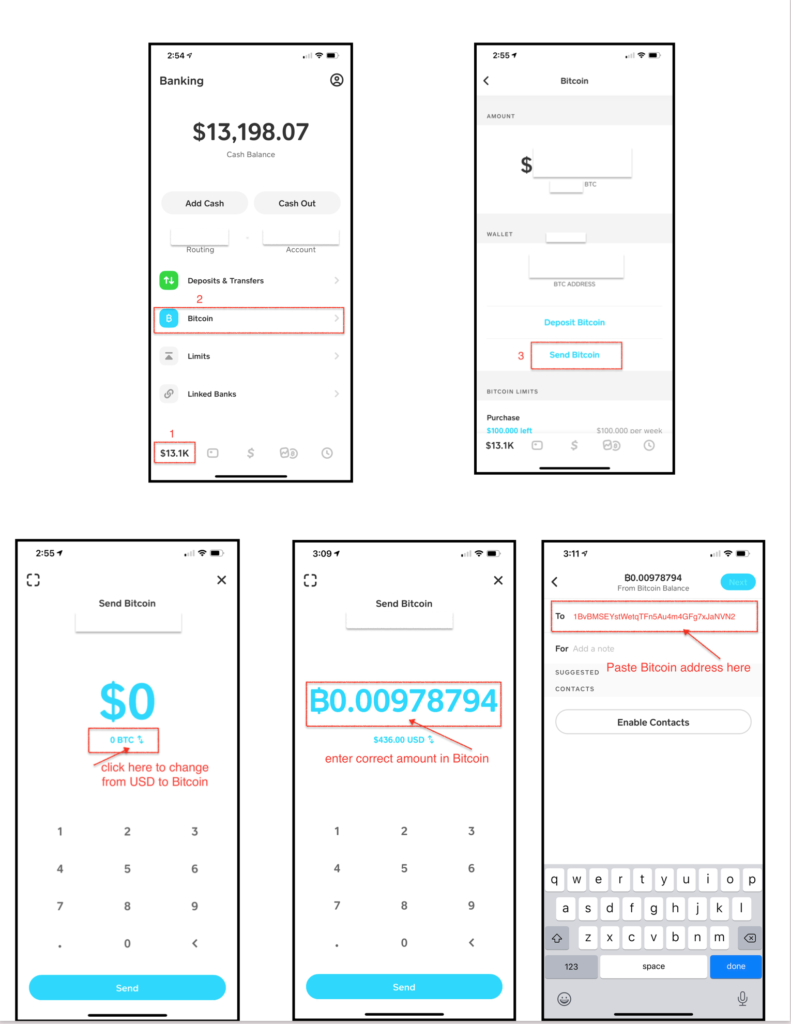
Option 1 The easiest way is to use the cash app on your phone to take a pic of that QR code we sent you and have it pulled up on the computer. If you do this it will auto populate the Bitcoin address and the amount needed for your order, right there in your Cash App wallet (see image below for where the camera QR code is located)

Option #2 Copy and paste both Bitcoin amount and Bitcoin address into Cash App.

  1. Tap the bottom left home icon, this should have a dollar amount listed on it (whatever the amount you have in your Cash App account)
  2. Tap the Bitcoin section in blue
  3. On the next page, select “Send Bitcoin”
  4. On the next page you will need to switch to BTC (rather than USD) to allow you to enter the amount in Bitcoin
  5. Enter or paste the appropriate amount of Bitcoin for your order and hit “Send”
  6. Paste the Bitcoin address we have given you. DO NOT TRY TO TYPE THIS OUT, YOU MUST COPY AND PASTE IT!
  7. Click next, and then send. It may ask you to confirm the transaction one more time, please look it over and make sure the address and amount look correct, then confirm and send.

Once you have sent the payment, we will receive it within 1-hour. Once we have seen the payment show up, we will immediately begin to process your order for shipping. All you need to do is sit back and wait for the order to arrive. If you do not receive any order updates within 8-hours, send us a message and we will look in to it!

If you have any questions on this process please message us and we’ll be happy to help you out.

[email protected]

Posted on 1 Comment

Henry Solis – SCAMMER

Here we have posted the info of a scammer. This fellow took advantage of our kindness and after a dozen attempts to get him to simply square up with us, he has decided to scam us. As many of you know, we are pretty easy to deal with and always give the customer the longer end of the stick in any issue that may arise. We did that in this case but were duped into believing lie after lie.

Henry Solis
1521 42nd Ave Ct
Greeley, CO 80634

This is the first time in several years I have posted someones info on the site, hopefully it will be the last…

We’ll be adding tracking #’s, and other identifying info daily so check back for updates.

Anyone with info on this guy please contact us at [email protected]


Posted on 2 Comments

Is scar tissue from injections hurting your growth?

Scar tissue can form in the muscles from many different things, but injections are probably the #1 cause of it in most bodybuilders who use AAS.. Anyone who has rotated their injection sites around to different muscles has most likely been doing this because of the scar tissue or swelling from previous injections. Everytime you inject into the muscle, you’re doing damage to the muscle resulting in scar tissue or adhesions. If you have been using injectable steroids for any length of time you will be familiar with rotating your injections sites from the glutes, shoulders, thighs, lats, etc. The main reason I did this in the beginning was my injection schedule was ‘every 3 days’ and wanted to give the last injection site some time to settle down before I hit it again allowing any swelling to subside. 

I didn’t realize this at the time, but all of those injections are creating a LOT of scar tissue in the muscles, and this scar tissue can have some very detrimental effects on the muscle and how it operates. I was researching some of the effects of what happens from repeated injections in the same muscle and I came upon some information that made me better understand the trama those injections cause. I found this description from Dr. Jon DeGorter online, and I like the way he breaks it down. He said “When a muscle is damaged the body does not actually repair the injury with new muscle, but with scar tissue. Adhesions, or internal scar tissue, are inflexible fibers that bind damaged soft tissue together. Scar tissue/adhesions that form around an injury are not as strong as the tissue it replaces. It has a tendency to contract and deform the surrounding tissues, compromising strength and flexibility.” When I hear that description and think of the hundreds or thousands of injections I have administered over the years I can’t help but form this mental image of a large blanket, peppered with hundreds of abstract puncture marks in it that have been stitched closed. You can imagine after a while it would get harder and harder to find some virgin material to properly stitch close the most recent puncture mark. You’d be forced to overlap some of the blanket here, and pull some material from over there to close the holes. After a while you would not recognize the blanket anymore with all of the repair stitching. The blanket won’t lay flat, and won’t work how it was intended.                    

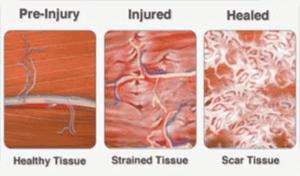
After repeated injections into the same muscle it’s going to really start causing some issues with how the muscle performs. All of those adhesions and scar tissue in the muscle will begin to accumulate making the fibers shorter, weaker, restricting blood and oxygen from properly moving through the muscle. It seems that your nerves would be affected negatively as well from this impingement, decreasing the signals being sent to and from the muscles. I have seen top tier bodybuilders show up on stage with one arm or thigh looking significantly smaller than the other one, and I suspect this is caused from some kind of nerve impairment that scar tissue most likely plays a role in. When we are lifting weights we’re constantly causing trauma to the muscle which results in scar tissue/adhesions to marble the muscle.  A quick google search and you can see some images of what this scar tissue actually looks like in a real muscle. The first time I saw what it looked like it surprised me! I was not expecting it to look like a spiderweb of sinew spun throughout the muscle? The adhesion/scar tissue is made up of a dense fibrous tissue. At the time of injury the scar tissue is very much needed, it’s made out of dense fibrous tissue and allows the muscle to be held together so to speak, after trauma or injury. You can think of it as scaffolding that helps to support the muscle as its healing, but this can become a deterrent once the muscle is healed causing decreased range of motion, pressure on nerves, and decreased blood flow. 

So what can we do about it? … There are several therapies used for breaking up this scar tissue and allowing blood flow and full range of motion to resume. A.R.T. (active release technique), Rolfing, Trigger point therapy, and Myofascial release are all forms of breaking up the scar tissue to rid the muscle, tendon and/or ligament of the adhesion. If you have a good therapist who specialises in one of these modalities it can drastically improve your condition when they are able to release some of these areas. The techniques are very painful as you can imagine, but the relief you receive is worth the pain in my opinion as you are allowing that muscle to finally ‘breath’. As you can imagine it will get expensive paying for multi hr long sessions with a specialist. I have devised a few ways to administer these same Myofascial release techniques on my own. Foam rolling and the like are great ways to open up the muscle, and I recommend using this technique to soften the muscle in preparation for going deeper. In order to break up the scar tissue you can experiment with a few different (torture lol) devices. A lacrosse ball, tennis ball, rubber dog ball, baseball, or any other ball that’s close in size to the ones mentioned works very good. Depending on the muscle your targeting, will determine what way is best to use the ball. If you’re like me, you have probably taken a lot of injections in the glutes, so I will describe what I do for my glutes here. Lay on your back with your knees up in the air, and your feet close to your rear end. Cross your right leg over your left leg so your right ankle is resting atop your left knee. Place the ball under your right glue and turn your whole body to the right a little to apply pressure on the ball. At this point you will want to move around on the ball to explore the muscle, you will find areas that have acute pain and/or are very tight. Once you find this spot where you can really feel the pain get acute, you’re there, you want to stay on this point with pressure. I like to sit on this spot for at least a minute or 2 or as long as I can bear the pain! I find that applying pressure in these painful spots for a few minutes the pain will begin to subside, the tension releases and it won’t be nearly as sensitive. At this point I will move slightly to the one side or the other, keeping the ball in the same spot, but focusing pressure around the perimeter of where I have been applying pressure (like an inch or 2 to the side). Sometimes you will find another spot here that has increased pain, if so I will repeat these steps with the pressure until I feel the pain dull. 

I like to go through the whole right glute muscle with the ball finding all these trigger points that are painful or very tight. Once I have had all the pain I can take on that side I will remove the ball, lay flat on my back and pull my right leg over the left side of my body trying to get my right knee over to the left side of my body where the knee can touch the ground or as close to it as I can get. This helps to stretch the glute wide open after the release. 

You can use your imagination with this ball technique to hit every muscle in your body. It’s very painful, but you can feel the results from it immediately when you’re done. I find this technique with the floor and the ball to be great for the shoulders, and all over the back as well. If you do a search on amazon for ‘myofascial release’ it will bring up pages of products that can be used in the same manner I have described. A quick search will produce Knobby balls, boomerang looking tools, and a host of other odd shaped, but very useful tools for getting deep into the muscle to break up that scar tissue for less then $30. 

I like to do this type of therapy on myself right before I go to bed in the evening. It’s amazing how much better the body feels after you’ve worked on some of those bound up scar tissue spots.  I think its smart to pay extra attention to the muscles you regularly inject into, as they are going to have more scar tissue built up in them. Don’t be afraid to work other areas of the body too, as scar tissue will hinder any muscles ability to perform optimally. 

If any of you have techniques or tricks for working out scar tissue or tight muscles I’m eager to hear more about it. I’d be interested to see what your opinion on this topic is so feel free to leave some feedback. 

Thanks, 

G and all of team GearDepot